> ## Documentation Index
> Fetch the complete documentation index at: https://docs.rulebase.co/llms.txt
> Use this file to discover all available pages before exploring further.
# Create a routing rule
> Assign tickets to a queue, role, or member automatically when an evaluation, approval, or complaint event fires.
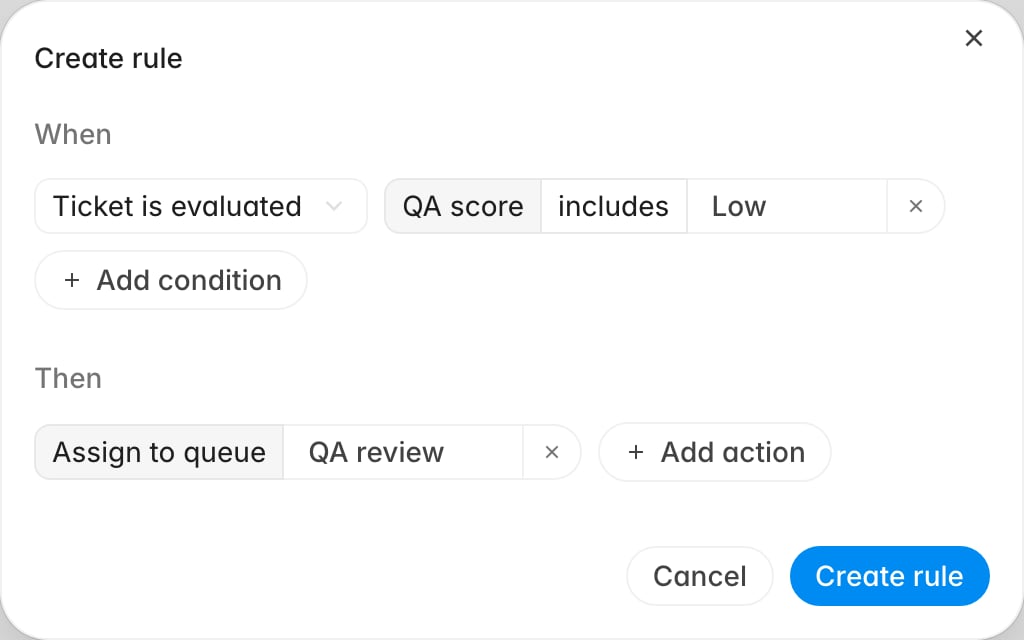
A routing rule watches for one event and does something when it happens. When AI
QA finishes scoring a ticket and the score comes back low, the rule can drop that
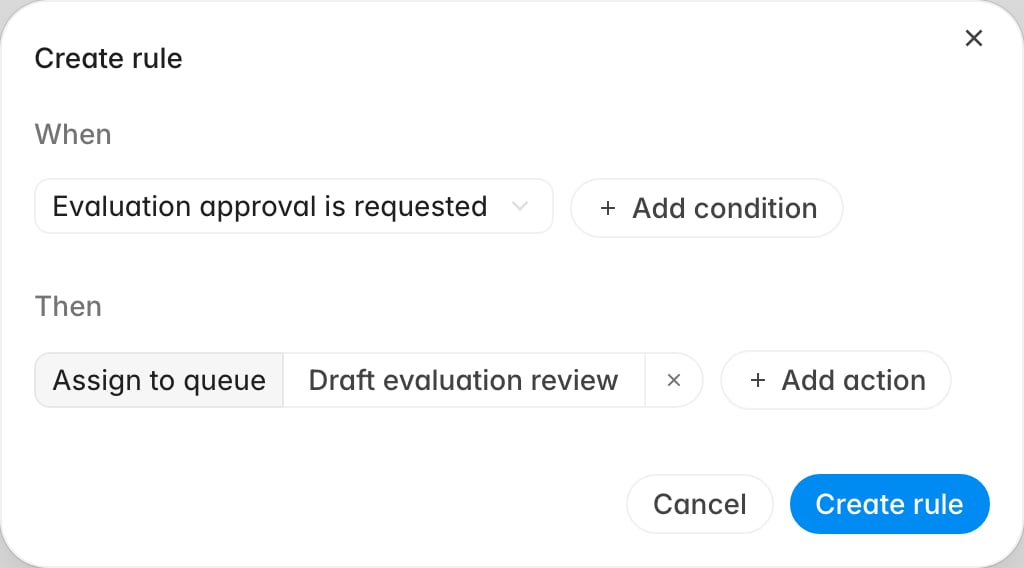
ticket into your review queue before anyone goes looking for it. When a trainer
submits a manual evaluation for validation, the rule can hand it to a reviewer.
Every rule reads as a sentence: **When** this event happens (optionally narrowed
by conditions), **Then** do these things. Conditions are optional; actions are
not. A rule with no action cannot be saved.
 ## Before you start
* You need access to manage organization settings.
* Decide the trigger first. It determines which conditions are even available to
you, so picking it changes what the rest of the dialog offers.
* If several people will share the routed work, create the destination queue
first under [Settings > Routing > Queues](https://app.rulebase.co/settings/routing/queues).
Routing to a queue is usually better than naming individuals, because the queue
survives people changing teams.
## Create a rule
1. Go to [Settings > Routing > Rules](https://app.rulebase.co/settings/routing/rules).
2. Click **Create rule**.
3. In **When**, pick the trigger event from the dropdown.
4. Optionally click **Add condition** and choose a field to narrow which tickets
match. Add as many as you need; a ticket must satisfy all of them.
5. In **Then**, click **Add action** and choose what should happen.
6. Click **Create rule**.
The rule takes effect on the next matching event. It does not reach back and
route tickets that already went through the trigger before you saved.
## Choose the trigger
A rule starts from one of these events:
* **Ticket is evaluated** — AI QA has finished scoring a ticket. This is the
general-purpose trigger for QA follow-up.
* **Evaluation approval is requested** — someone submitted a manual evaluation
that needs validation. Pair this with a review queue.
* **Ticket changes status** — the ticket moved to a new status in your helpdesk.
* **Evaluation is contested** — an agent disputed an evaluation result.
* **Complaint is created** — a complaint record was raised.
## Before you start
* You need access to manage organization settings.
* Decide the trigger first. It determines which conditions are even available to
you, so picking it changes what the rest of the dialog offers.
* If several people will share the routed work, create the destination queue
first under [Settings > Routing > Queues](https://app.rulebase.co/settings/routing/queues).
Routing to a queue is usually better than naming individuals, because the queue
survives people changing teams.
## Create a rule
1. Go to [Settings > Routing > Rules](https://app.rulebase.co/settings/routing/rules).
2. Click **Create rule**.
3. In **When**, pick the trigger event from the dropdown.
4. Optionally click **Add condition** and choose a field to narrow which tickets
match. Add as many as you need; a ticket must satisfy all of them.
5. In **Then**, click **Add action** and choose what should happen.
6. Click **Create rule**.
The rule takes effect on the next matching event. It does not reach back and
route tickets that already went through the trigger before you saved.
## Choose the trigger
A rule starts from one of these events:
* **Ticket is evaluated** — AI QA has finished scoring a ticket. This is the
general-purpose trigger for QA follow-up.
* **Evaluation approval is requested** — someone submitted a manual evaluation
that needs validation. Pair this with a review queue.
* **Ticket changes status** — the ticket moved to a new status in your helpdesk.
* **Evaluation is contested** — an agent disputed an evaluation result.
* **Complaint is created** — a complaint record was raised.
 ## Narrow with conditions
Conditions filter the tickets a trigger applies to. The available fields depend
on the trigger you chose, so the **Add condition** menu shows a different list
for **Ticket is evaluated** than it does for **Evaluation is contested**. Across
the five triggers the fields on offer are **Workspace**, **QA score**, **Agent QA
score**, **Failed criteria**, **Group**, **Partner**, **Channel**, **Ticket
status**, **Number of disputes by an agent**, **Contested evaluation source**,
and **Complaint risk**. Switching the trigger after you have added conditions
drops any that the new trigger does not support.
Most conditions use an **includes** operator and let you tick several values at
once. **QA score** offers Autozero, Low, Medium, and High, so a single condition
can cover "Autozero or Low" and catch both tiers of poor result. Two fields are
single-value comparisons instead: **Number of disputes by an agent** takes a
number, and **Contested evaluation source** is either **AI** or **Manual**.
A rule with no conditions matches every occurrence of its trigger. That's a
legitimate way to build a catch-all, but it should sit below your specific rules,
not above them.
## Pick the actions
A rule runs every action you attach to it, so one rule can assign a ticket and
send a notification at the same time.
| Action | What Rulebase does |
| ----------------------- | --------------------------------------------------------------------------------- |
| **Assign to queue** | Puts the ticket in the queue, which then assigns it to one of its members |
| **Assign to role** | Picks one member holding that role, at random, and assigns the ticket to them |
| **Assign to member** | Picks one of the members you selected, at random, and assigns the ticket to them |
| **Resolve** | Marks the ticket resolved with an optional comment, if it is currently unresolved |
| **Send a notification** | Sends an email to the addresses you list, or posts to a Slack or Teams channel |
On **Assign to role** and **Assign to member**, selecting five members does
not notify all five: Rulebase spreads the work across them one ticket at a
time. If you want everyone to see the ticket,
add a notification action alongside the assignment.
A notification action is per-rule. Your organization's standing recipients and
channels (the weekly customer issues digest, and the channel that gets
complaint alerts) are set in
[Configure notifications](/guides/settings/configure-notifications).
The two overlap in one place. When a **Complaint is created** rule matches and
sends a notification, it takes over for that complaint so you get one message
rather than two. If no rule matches, Rulebase sends the alert to your default
complaint channel instead.
## Worked example: route evaluations to validators
One common reason teams build a routing rule is manual evaluation validation.
1. Create a queue named `Evaluation validation` under
[Settings > Routing > Queues](https://app.rulebase.co/settings/routing/queues)
and add your reviewers to it.
2. Create a rule with **When** set to **Evaluation approval is requested**.
3. Leave conditions empty if every submitted evaluation should be reviewed, or
add a **Failed criteria** or **QA score** condition to narrow the route.
4. In **Then**, add **Assign to queue** and select the review queue.
Submitters now use **Submit for review** and the ticket lands with a validator
without anyone forwarding it. The submitter's manual evaluation already counts;
the validator can publish corrections as the overriding evaluation.
## Order your rules and confirm they fire
Rules have an explicit order on the Rules page and Rulebase evaluates them in
that order, stopping at the first rule that matches, so put narrow rules above
broad fallbacks. A catch-all sitting at the top will swallow the tickets your
specific rules were meant to catch.
One catch-all is already there. Most organizations start with a rule showing
**Any** under Conditions and `-` under Actions, and although it looks inert it
still claims low-scoring tickets and stops the rules beneath it from running.
Drag your new rule above it.
[Manage and reorder routing rules](/guides/quality-assurance/manage-routing-rules)
covers ordering as a skill, and
[Why didn't my routing rule fire?](/guides/troubleshooting/why-didnt-my-routing-rule-fire)
has the full diagnosis when a rule that looks correct never runs.
Once the rule is saved, confirm it works before relying on it:
* Trigger the event on a real ticket and check that the ticket lands where you
expect.
* Confirm the assignee is someone you intended. If a rule assigns to a role, the
pool is everyone with that role, which may be wider than you assumed.
* Check that a ticket you expected to be excluded was in fact skipped. This is
where a missing condition usually shows up.
* If nothing happened, re-check the trigger. Matching the wrong event is more
common than a bad condition.
## Related
* [Manage and reorder routing rules](/guides/quality-assurance/manage-routing-rules)
* [Create and manage queues](/guides/quality-assurance/create-and-manage-queues)
* [Perform a manual evaluation](/guides/quality-assurance/perform-a-manual-evaluation)
* [Configure notifications](/guides/settings/configure-notifications)
* [Set SLA targets and business hours](/guides/settings/set-sla-targets-and-business-hours)
* [Add scorecard additional instructions](/guides/quality-assurance/add-scorecard-additional-instructions)
* [Invite members](/guides/access-management/invite-members)
* [Roles and permissions](/guides/roles-and-permissions)
## Narrow with conditions
Conditions filter the tickets a trigger applies to. The available fields depend
on the trigger you chose, so the **Add condition** menu shows a different list
for **Ticket is evaluated** than it does for **Evaluation is contested**. Across
the five triggers the fields on offer are **Workspace**, **QA score**, **Agent QA
score**, **Failed criteria**, **Group**, **Partner**, **Channel**, **Ticket
status**, **Number of disputes by an agent**, **Contested evaluation source**,
and **Complaint risk**. Switching the trigger after you have added conditions
drops any that the new trigger does not support.
Most conditions use an **includes** operator and let you tick several values at
once. **QA score** offers Autozero, Low, Medium, and High, so a single condition
can cover "Autozero or Low" and catch both tiers of poor result. Two fields are
single-value comparisons instead: **Number of disputes by an agent** takes a
number, and **Contested evaluation source** is either **AI** or **Manual**.
A rule with no conditions matches every occurrence of its trigger. That's a
legitimate way to build a catch-all, but it should sit below your specific rules,
not above them.
## Pick the actions
A rule runs every action you attach to it, so one rule can assign a ticket and
send a notification at the same time.
| Action | What Rulebase does |
| ----------------------- | --------------------------------------------------------------------------------- |
| **Assign to queue** | Puts the ticket in the queue, which then assigns it to one of its members |
| **Assign to role** | Picks one member holding that role, at random, and assigns the ticket to them |
| **Assign to member** | Picks one of the members you selected, at random, and assigns the ticket to them |
| **Resolve** | Marks the ticket resolved with an optional comment, if it is currently unresolved |
| **Send a notification** | Sends an email to the addresses you list, or posts to a Slack or Teams channel |
On **Assign to role** and **Assign to member**, selecting five members does
not notify all five: Rulebase spreads the work across them one ticket at a
time. If you want everyone to see the ticket,
add a notification action alongside the assignment.
A notification action is per-rule. Your organization's standing recipients and
channels (the weekly customer issues digest, and the channel that gets
complaint alerts) are set in
[Configure notifications](/guides/settings/configure-notifications).
The two overlap in one place. When a **Complaint is created** rule matches and
sends a notification, it takes over for that complaint so you get one message
rather than two. If no rule matches, Rulebase sends the alert to your default
complaint channel instead.
## Worked example: route evaluations to validators
One common reason teams build a routing rule is manual evaluation validation.
1. Create a queue named `Evaluation validation` under
[Settings > Routing > Queues](https://app.rulebase.co/settings/routing/queues)
and add your reviewers to it.
2. Create a rule with **When** set to **Evaluation approval is requested**.
3. Leave conditions empty if every submitted evaluation should be reviewed, or
add a **Failed criteria** or **QA score** condition to narrow the route.
4. In **Then**, add **Assign to queue** and select the review queue.
Submitters now use **Submit for review** and the ticket lands with a validator
without anyone forwarding it. The submitter's manual evaluation already counts;
the validator can publish corrections as the overriding evaluation.
## Order your rules and confirm they fire
Rules have an explicit order on the Rules page and Rulebase evaluates them in
that order, stopping at the first rule that matches, so put narrow rules above
broad fallbacks. A catch-all sitting at the top will swallow the tickets your
specific rules were meant to catch.
One catch-all is already there. Most organizations start with a rule showing
**Any** under Conditions and `-` under Actions, and although it looks inert it
still claims low-scoring tickets and stops the rules beneath it from running.
Drag your new rule above it.
[Manage and reorder routing rules](/guides/quality-assurance/manage-routing-rules)
covers ordering as a skill, and
[Why didn't my routing rule fire?](/guides/troubleshooting/why-didnt-my-routing-rule-fire)
has the full diagnosis when a rule that looks correct never runs.
Once the rule is saved, confirm it works before relying on it:
* Trigger the event on a real ticket and check that the ticket lands where you
expect.
* Confirm the assignee is someone you intended. If a rule assigns to a role, the
pool is everyone with that role, which may be wider than you assumed.
* Check that a ticket you expected to be excluded was in fact skipped. This is
where a missing condition usually shows up.
* If nothing happened, re-check the trigger. Matching the wrong event is more
common than a bad condition.
## Related
* [Manage and reorder routing rules](/guides/quality-assurance/manage-routing-rules)
* [Create and manage queues](/guides/quality-assurance/create-and-manage-queues)
* [Perform a manual evaluation](/guides/quality-assurance/perform-a-manual-evaluation)
* [Configure notifications](/guides/settings/configure-notifications)
* [Set SLA targets and business hours](/guides/settings/set-sla-targets-and-business-hours)
* [Add scorecard additional instructions](/guides/quality-assurance/add-scorecard-additional-instructions)
* [Invite members](/guides/access-management/invite-members)
* [Roles and permissions](/guides/roles-and-permissions)