> ## Documentation Index
> Fetch the complete documentation index at: https://docs.rulebase.co/llms.txt
> Use this file to discover all available pages before exploring further.
# Set SLA targets and business hours
> Build an SLA policy with response and resolution targets, then define the work schedule and holidays those timers run against.
An SLA policy answers two questions: how fast should we reply, and when does the
clock run. The first is a set of targets per ticket priority. The second is a
work schedule: Rulebase measures targets in business hours, so until you tell it which hours those are, a four-hour
first-response target set at 5pm on Friday is breached by 9pm on Friday.
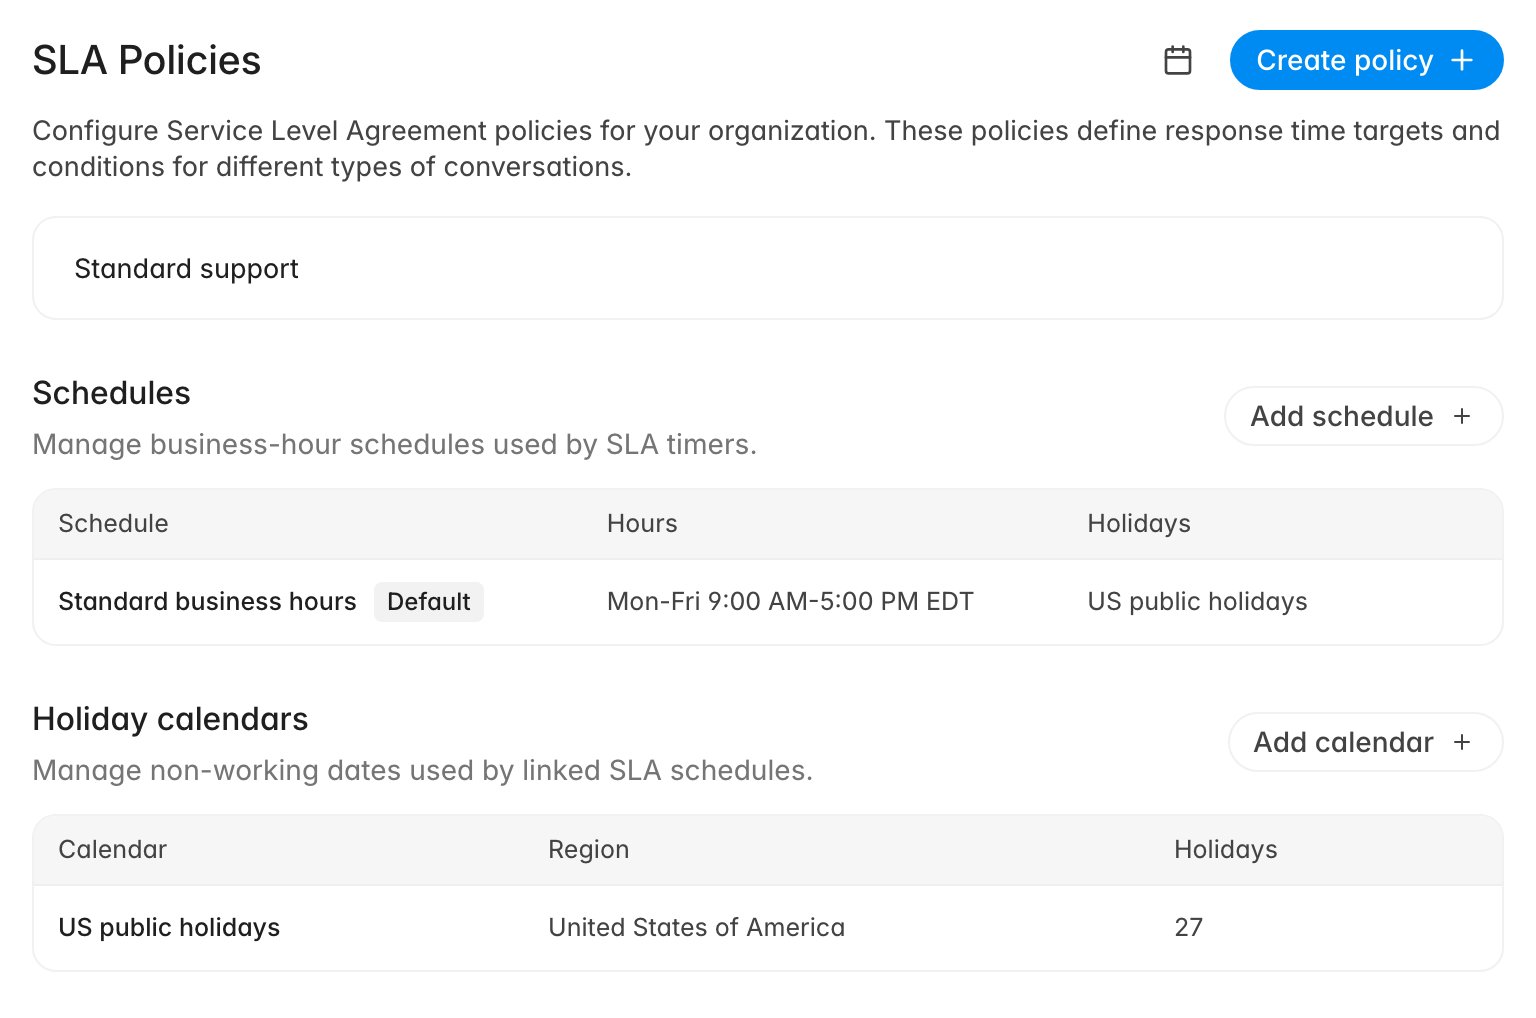
Policies, schedules, and the holiday calendars those schedules skip all sit on
one page.
 ## Before you start
* The page is [Settings > SLA policies](https://app.rulebase.co/settings/sla-policies),
under **Configuration** in the settings sidebar. No feature toggle gates it.
* You need an admin role.
* Connect a help desk first. SLA outcomes are calculated from synced tickets, so
a policy built before any integration exists has nothing to measure.
* Decide which channels the policy covers and what you promise at each ticket
priority before you start clicking. Both are editable later, but saving a
policy rewrites its conditions and targets wholesale, so it is a page you want
to fill in deliberately rather than incrementally.
## Create the policy
1. Click **Create policy**.
2. Give it a **Name** your team will recognise in a chart legend; policy names
appear as a filter on SLA dashboard charts.
3. Add a **Description** if the name needs qualifying.
4. Click **Create policy**, then open the policy from the list.
Ignore **Set as default policy** in this dialog. A policy is matched to a ticket
by its conditions, and the default flag is not a reliable substitute for them, so
give every policy at least one condition. A policy with no conditions is not
applied to anything.
## Say which tickets it covers
Conditions are what make a policy apply, and there is one field to key on:
**Channel**.
1. On the policy, click **Add condition**.
2. Leave **Type** as **Channel**.
3. Choose the **Operator**. Use **includes** whenever you want more than one
channel; **is** and **equals** compare against a single value and match
nothing when two are selected.
4. Under **Value**, pick from **Call**, **Email**, and **Chat**.
Several policies can apply to the same ticket if their conditions all match, which
is how a stricter chat policy and a general email policy coexist. It is also how
you accidentally double-count breaches, so keep the channel sets disjoint unless
you mean to overlap them.
## Set a target for each priority
A target is one metric measured across the four ticket priorities. Three metrics
are available and each can be used once per policy:
* **First response time** — from the ticket arriving to the first agent reply.
* **Next response time** — the gap on each subsequent customer message.
* **Resolution time** — from arrival to the ticket being resolved.
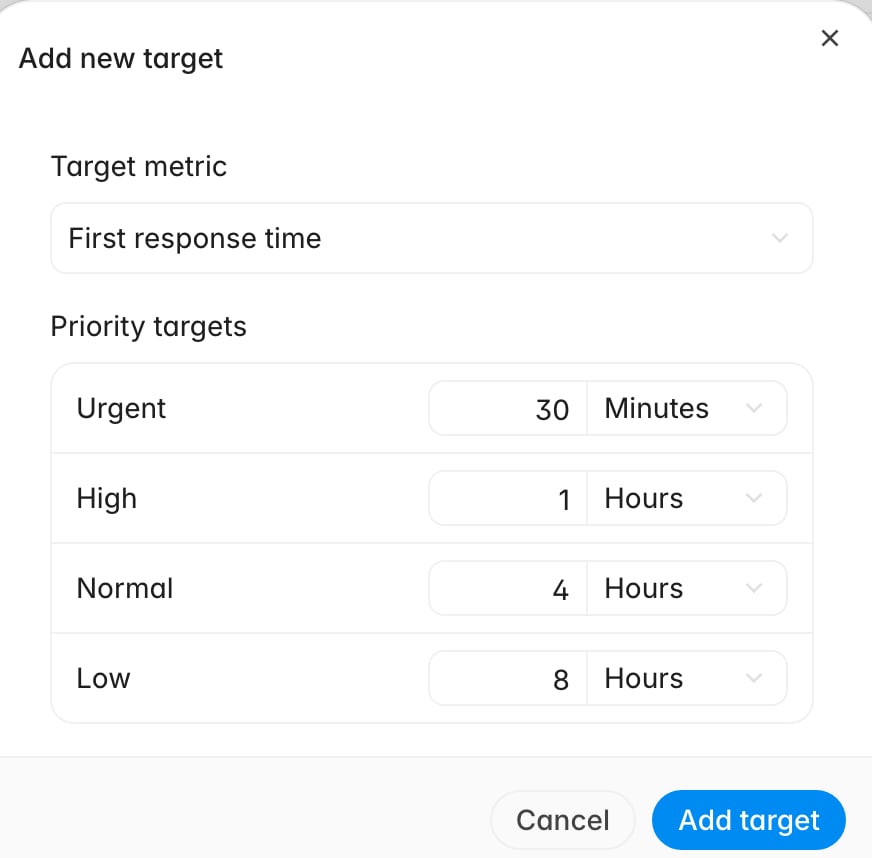
1. Click **Add target**.
2. Pick the **Target metric**. Metrics already on this policy are not offered
again, and **Add target** greys out once all three are in use.
3. For each of **Urgent**, **High**, **Normal**, and **Low**, enter a number and
choose **Minutes**, **Hours**, or **Seconds**.
4. Click **Add target**, and repeat for the next metric.
## Before you start
* The page is [Settings > SLA policies](https://app.rulebase.co/settings/sla-policies),
under **Configuration** in the settings sidebar. No feature toggle gates it.
* You need an admin role.
* Connect a help desk first. SLA outcomes are calculated from synced tickets, so
a policy built before any integration exists has nothing to measure.
* Decide which channels the policy covers and what you promise at each ticket
priority before you start clicking. Both are editable later, but saving a
policy rewrites its conditions and targets wholesale, so it is a page you want
to fill in deliberately rather than incrementally.
## Create the policy
1. Click **Create policy**.
2. Give it a **Name** your team will recognise in a chart legend; policy names
appear as a filter on SLA dashboard charts.
3. Add a **Description** if the name needs qualifying.
4. Click **Create policy**, then open the policy from the list.
Ignore **Set as default policy** in this dialog. A policy is matched to a ticket
by its conditions, and the default flag is not a reliable substitute for them, so
give every policy at least one condition. A policy with no conditions is not
applied to anything.
## Say which tickets it covers
Conditions are what make a policy apply, and there is one field to key on:
**Channel**.
1. On the policy, click **Add condition**.
2. Leave **Type** as **Channel**.
3. Choose the **Operator**. Use **includes** whenever you want more than one
channel; **is** and **equals** compare against a single value and match
nothing when two are selected.
4. Under **Value**, pick from **Call**, **Email**, and **Chat**.
Several policies can apply to the same ticket if their conditions all match, which
is how a stricter chat policy and a general email policy coexist. It is also how
you accidentally double-count breaches, so keep the channel sets disjoint unless
you mean to overlap them.
## Set a target for each priority
A target is one metric measured across the four ticket priorities. Three metrics
are available and each can be used once per policy:
* **First response time** — from the ticket arriving to the first agent reply.
* **Next response time** — the gap on each subsequent customer message.
* **Resolution time** — from arrival to the ticket being resolved.
1. Click **Add target**.
2. Pick the **Target metric**. Metrics already on this policy are not offered
again, and **Add target** greys out once all three are in use.
3. For each of **Urgent**, **High**, **Normal**, and **Low**, enter a number and
choose **Minutes**, **Hours**, or **Seconds**.
4. Click **Add target**, and repeat for the next metric.
 Leave a priority at 0 and no target is created for it, the right move
when you have no commitment at that priority. Filling all four is
usually easier to explain to the team than a policy with gaps.
## Stop the clock while you are waiting on the customer
**Pause Statuses** takes the status names from your help desk. While a ticket
sits in one of them, the timer stops and the deadline shifts by however long the
pause lasted, so a customer who takes three days to reply does not cost you the
breach.
Type the status exactly as your help desk spells it (for example `pending`,
`on-hold`, `waiting for customer`) and click **Add**. Matching ignores case but not
spelling, and a status name that does not exist in your help desk simply never
pauses anything.
Leave a priority at 0 and no target is created for it, the right move
when you have no commitment at that priority. Filling all four is
usually easier to explain to the team than a policy with gaps.
## Stop the clock while you are waiting on the customer
**Pause Statuses** takes the status names from your help desk. While a ticket
sits in one of them, the timer stops and the deadline shifts by however long the
pause lasted, so a customer who takes three days to reply does not cost you the
breach.
Type the status exactly as your help desk spells it (for example `pending`,
`on-hold`, `waiting for customer`) and click **Add**. Matching ignores case but not
spelling, and a status name that does not exist in your help desk simply never
pauses anything.
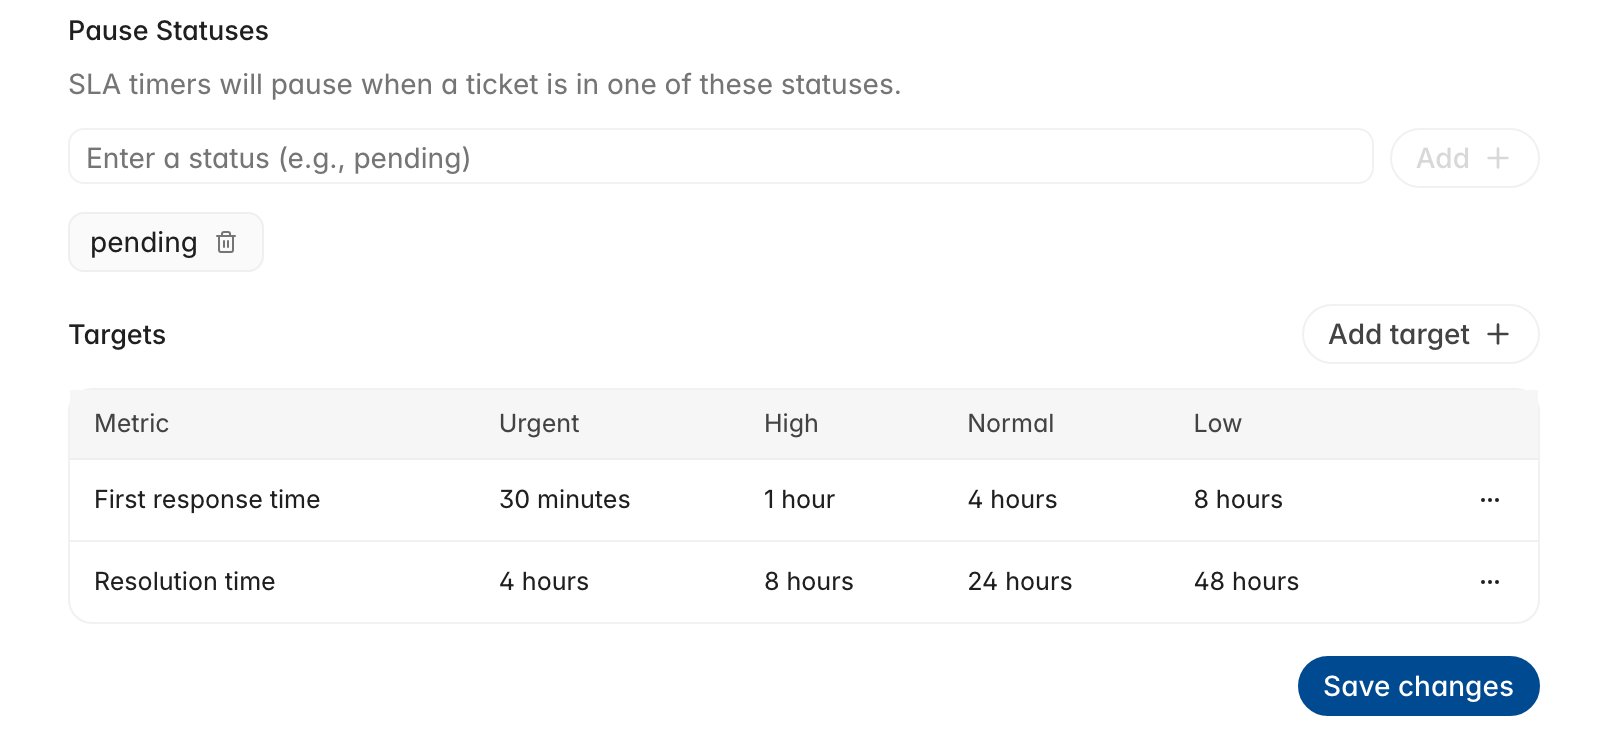 **Save changes** rebuilds the policy's conditions and targets from what is on
screen. Finish the whole policy in one pass and save once. Do not leave a blank
condition row in place when you save, and re-open the policy afterwards to
confirm the targets are still listed.
## Teach Rulebase your working week
Targets created here are measured in business hours. With no schedule to consult,
Rulebase falls back to continuous elapsed time, so an untouched
account looks like it is breaching overnight and at weekends. Fix that once, at
the bottom of the same page.
Start with the holidays, because a schedule can link a calendar the moment you
create it.
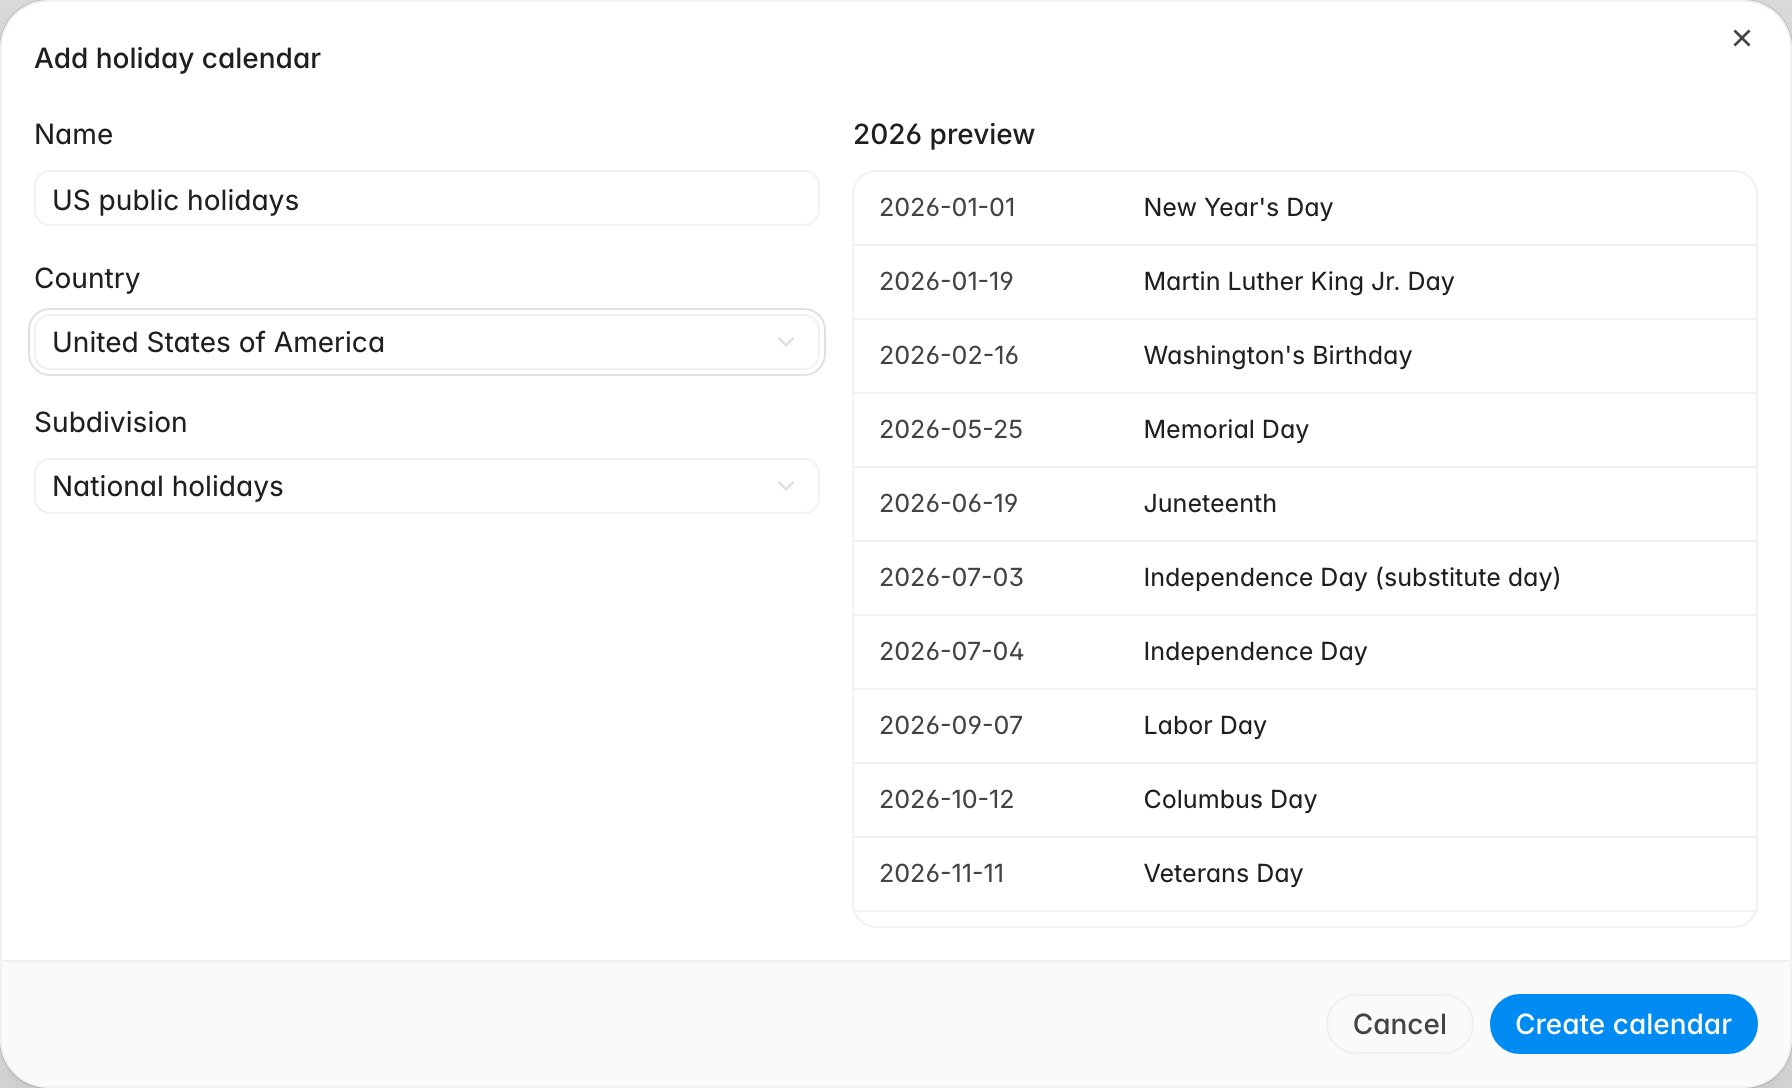
1. Next to **Holiday calendars**, click **Add calendar**.
2. Name it, choose the **Country**, and narrow it with **Subdivision** if a
region observes different days. Leave the subdivision on **National holidays**
for the country-wide set.
3. Check the year preview on the right, then click **Create calendar**.
**Save changes** rebuilds the policy's conditions and targets from what is on
screen. Finish the whole policy in one pass and save once. Do not leave a blank
condition row in place when you save, and re-open the policy afterwards to
confirm the targets are still listed.
## Teach Rulebase your working week
Targets created here are measured in business hours. With no schedule to consult,
Rulebase falls back to continuous elapsed time, so an untouched
account looks like it is breaching overnight and at weekends. Fix that once, at
the bottom of the same page.
Start with the holidays, because a schedule can link a calendar the moment you
create it.
1. Next to **Holiday calendars**, click **Add calendar**.
2. Name it, choose the **Country**, and narrow it with **Subdivision** if a
region observes different days. Leave the subdivision on **National holidays**
for the country-wide set.
3. Check the year preview on the right, then click **Create calendar**.
 Then the schedule:
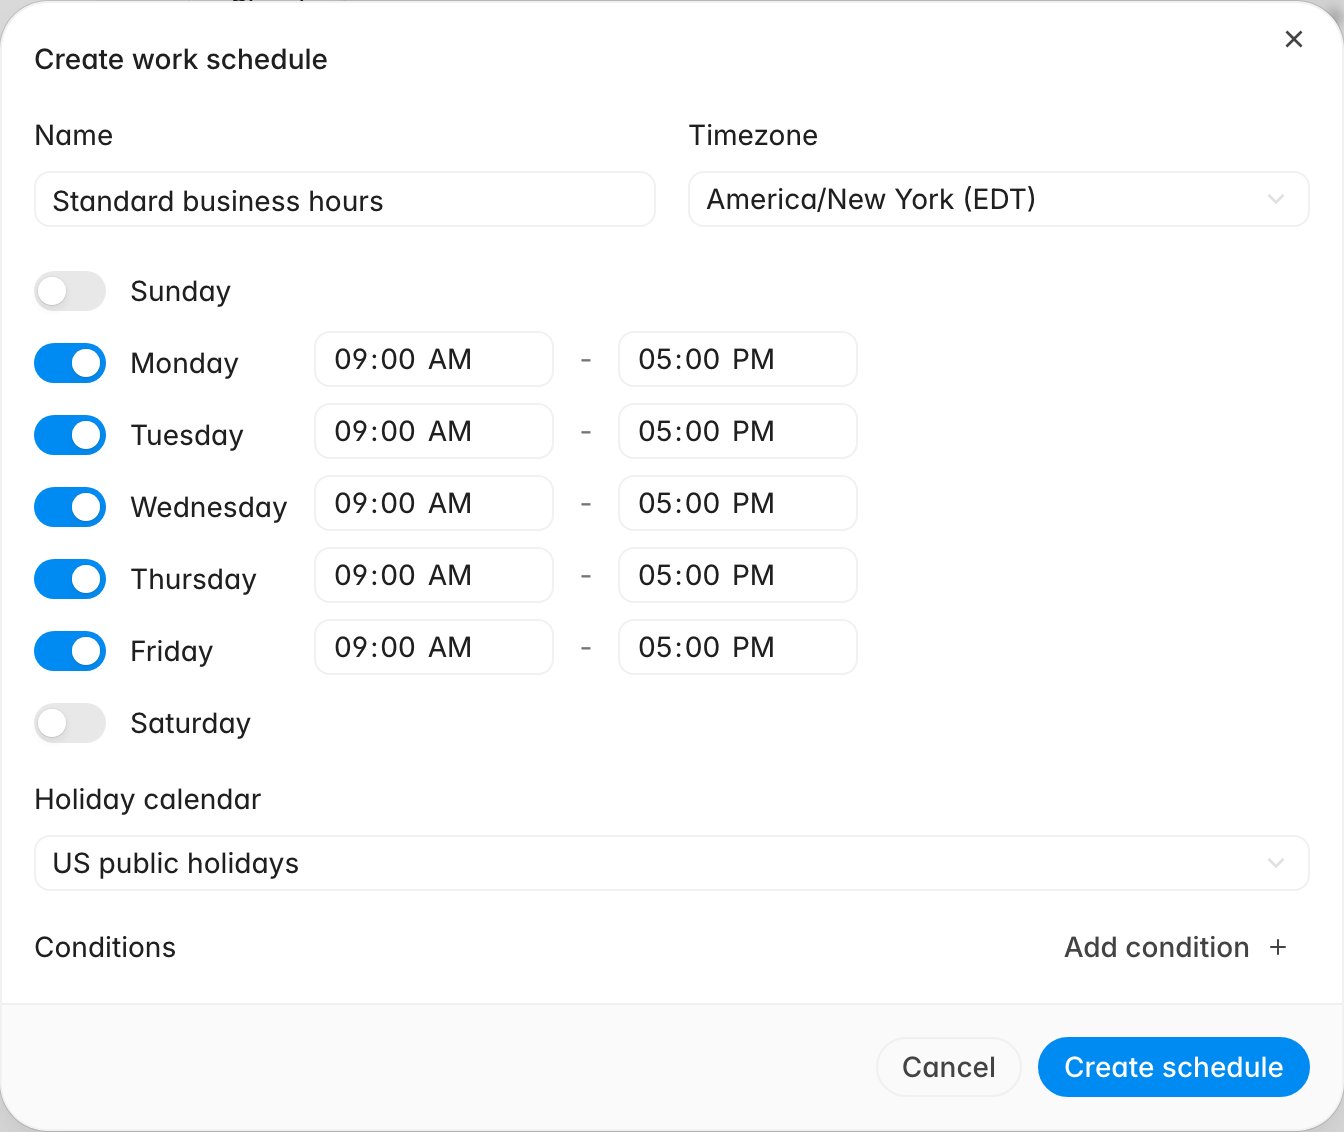
1. Next to **Schedules**, click **Add schedule**.
2. Name it and set the **Timezone**. Every start and end time you enter is read
in this timezone, so pick the one your team actually works in rather than the
organization's reporting timezone.
3. Switch on the days you work and set the hours. Monday to Friday, 9:00 AM to
5:00 PM is the starting point.
4. Choose the **Holiday calendar** you just created.
5. Click **Create schedule**.
Then the schedule:
1. Next to **Schedules**, click **Add schedule**.
2. Name it and set the **Timezone**. Every start and end time you enter is read
in this timezone, so pick the one your team actually works in rather than the
organization's reporting timezone.
3. Switch on the days you work and set the hours. Monday to Friday, 9:00 AM to
5:00 PM is the starting point.
4. Choose the **Holiday calendar** you just created.
5. Click **Create schedule**.
 Finally, connect the schedule to your timers: open the row's **⋯** menu and
choose **Make default**. A **Default** badge
appears next to the name. Schedules that are not the default, and carry no
conditions, are never consulted.
If your coverage differs by region or brand, create the extra schedules with
conditions and keep one plain schedule as the default. Rulebase prefers a
matching conditional schedule and falls back to the default.
## Choose the week your reports start on
The calendar icon beside **Create policy** opens **SLA reporting window**, where
**Week starts on** sets the week boundary for SLA reports and the weekly SLA
dashboard charts. It defaults to Sunday. Set it to whatever your operations week
uses; otherwise a Monday-to-Sunday team reads every weekly chart off by a day.
## Confirm it before you rely on it
Check these in order:
* The policy list shows your policy, and opening it still shows the conditions
and targets you saved.
* The **Schedules** table shows a **Default** badge, with the hours and timezone
you expect.
* The holiday calendar's count looks right for the country you chose, and the
schedule row lists it under **Holidays**.
* A ticket that arrived outside working hours has a deadline that starts at the
next working morning rather than an hour after it landed.
Outcomes surface on dashboard charts built from the **SLA breaches**, **SLA
adherence**, and **SLA weekly outcomes** data sources, filterable by policy.
[Manage dashboard charts](/guides/insights/manage-dashboard-charts) covers
building those.
## Related
* [Manage dashboard charts](/guides/insights/manage-dashboard-charts)
* [Set score bands and the contest window](/guides/settings/set-score-bands-and-contest-window)
* [Glossary](/guides/concepts/glossary)
Finally, connect the schedule to your timers: open the row's **⋯** menu and
choose **Make default**. A **Default** badge
appears next to the name. Schedules that are not the default, and carry no
conditions, are never consulted.
If your coverage differs by region or brand, create the extra schedules with
conditions and keep one plain schedule as the default. Rulebase prefers a
matching conditional schedule and falls back to the default.
## Choose the week your reports start on
The calendar icon beside **Create policy** opens **SLA reporting window**, where
**Week starts on** sets the week boundary for SLA reports and the weekly SLA
dashboard charts. It defaults to Sunday. Set it to whatever your operations week
uses; otherwise a Monday-to-Sunday team reads every weekly chart off by a day.
## Confirm it before you rely on it
Check these in order:
* The policy list shows your policy, and opening it still shows the conditions
and targets you saved.
* The **Schedules** table shows a **Default** badge, with the hours and timezone
you expect.
* The holiday calendar's count looks right for the country you chose, and the
schedule row lists it under **Holidays**.
* A ticket that arrived outside working hours has a deadline that starts at the
next working morning rather than an hour after it landed.
Outcomes surface on dashboard charts built from the **SLA breaches**, **SLA
adherence**, and **SLA weekly outcomes** data sources, filterable by policy.
[Manage dashboard charts](/guides/insights/manage-dashboard-charts) covers
building those.
## Related
* [Manage dashboard charts](/guides/insights/manage-dashboard-charts)
* [Set score bands and the contest window](/guides/settings/set-score-bands-and-contest-window)
* [Glossary](/guides/concepts/glossary)